Printing Excel Sheets

Whenever you come up with a useful sheet, it is almost always essential to get it printed. Be it a simple sheet or complex business model, we can not deny the importance of a hard printed copy – it is always easier to read and record. Moreover it fulfills the gap when we want to share the documentation with others.
So in this post we will discuss some common issues that we face when printing an Excels sheet.
First thing first – setting up page for your sheet to print:
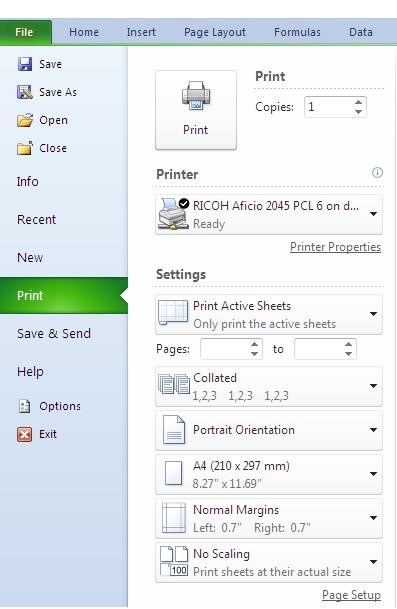
The page set up for printing in Excel 2010 can be accessed by either printing Ctrl+P or by going to Files > Print and then selecting the appropriate options. Here you can choose from wealth of options to print whatever you want.
Selecting a Printer:
As you preview the file to be printed you can set the print you want to work with. Here you can also use 3rd party plug-ins to print to PDF files in order to share the document. Besides this you can also save your documents as PDF directly from Excel 2010 onwards.
Selecting what to print:
Depending on your needs, you may need to print the entire workbook, just a part of it or simply the active sheet.
Most of the time, the entire workbook and the sheet are too big to print and the data is limited to only few pages with a sheet, so you need to select them and print.
For larger model, the data may be split into several sheets, in such case you can print entire worksheet or entire workbook. (For practical reasons, I have found printing selection to be most suitable option for printing for small to moderate and regularly produced sheets.)
Setting up Orientation:
Should it be landscape print or portrait? Again it depends on the layout of your sheet. Either of the options can be set from the orientation option. Sheets with large number of columns can well be printed using landscape mode. It depends on one’s own aesthetic sense how he sets up the sheet.
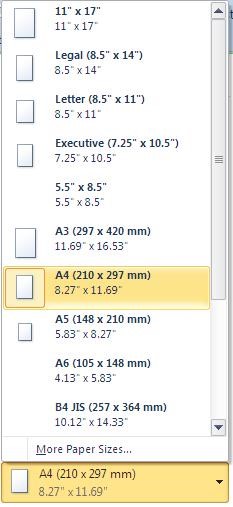 Selecting Paper to print on:
Most of the time we printing on a standard A4 size paper. But this varies from situation to situation. If you printing on Letter or Legal size, you can make the changes from this option.
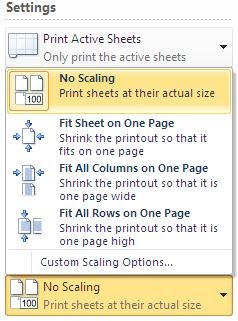
Managing Scaling in printed sheets
Larger sheets tend to create problem when printed. They may split over several pages and result in wastage of resources and time. In order to fit the entire page on one sheet, you can select fit to page option. If you have long header row i.e. large number of columns, you can select the option of fit rows on one page, so that only columns are changes over the pages, and vise versa if number of rows needed to be changed over pages – we have to select the fit column on one page.
Making printed stacks – using collation options:
If you are printing multiple copies of several sheets, it may be desirable to get them stacked separately so that you do not have to separate them in different stacks.
You can choose between collated and un-collated – as per your requirement and then print the sheet.
Conclusion:
Managing how you print your sheet helps in improving its presentation and makes your documents look more professional and save resources like time and paper. In a next article of this series we will discussion few more options that can make your document stand out from other documents.

Related Tutorials

Excel model can be as simple as adding up two values in cell or so complicated to cover multiple sheets or even multiple workbooks
Excel is a life saver at work and there is always a free online training for Excel in the internet. At Sheetzoom, we offer free excel...

Excel has a built in function to create hyperlinks – named HYPERLINK(). This function is useful when you want the user to be redirected to some other place for e...


Latest
-
Understanding How HYPERLINK Works In Excel
Excel has a built in function to create hyperlinks &...
-
Understanding how MS Excel Query Works
“Query” in MS Excel has same meaning as ...
-
An Introduction To Excel Power Map
Our today’s post is about “Power Map&rdq...
-
Using Pivot Charts For Displaying Data
Conventional charts are mostly used for displaying r...
-
Using “Calculated Items” For Analyzing A Pivot Table
In our last post, we explored how to use calculated ...