Understanding how MS Excel Query Works

“Query” in MS Excel has same meaning as it has in our daily lives. It inquiries from our database and return some results or information. In today’s post we will explore what the options available when we want to inquire something from a database, how query works and few examples to learn the basics.
What we need for this tutorial:
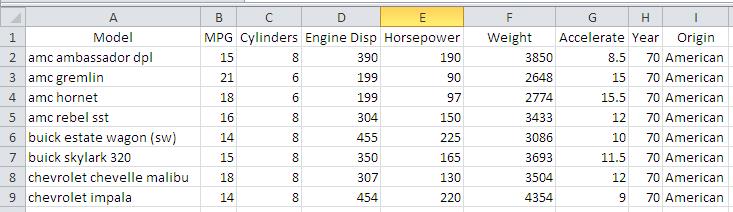
We will be using a data that is easily downloadable and will be of interest to most of us – cars.xlsx. This database lists cars of various brands and their specs: Cylinders, Engine Displacement, Horse power etc. so it will be interesting to so how query works with this small database. Here is a snap shot of it.
Setting up the worksheet:
For query to work, our sheet should be in the form of a table – as is shown in the above picture. And we have saved this file as a .csv file as well. This will ensure that the file has “only” data and no formatting with it at all.
Now we open a blank excel sheet and try to use MS Query to bring in data from the closed CSV file.
Setting up data source in new excel workbook:
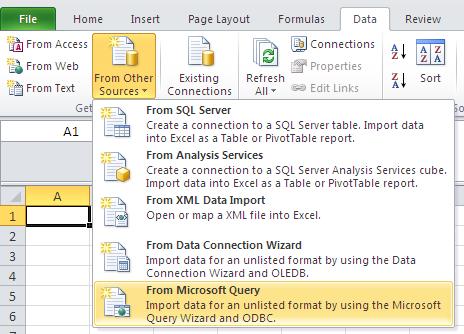
With blank sheet active, go to tab Data>From Other Sources>From MS Query. When you select this option it will open yet another dialogue box, asking for the source file. It will give user multiple options like dBASE file, Excel or MS Access database.
For these three we will obviously select the second one – Excel.
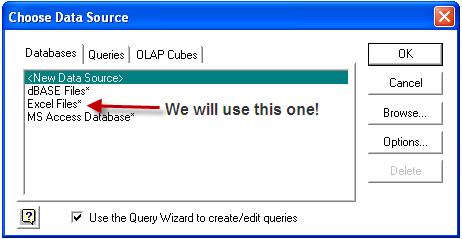
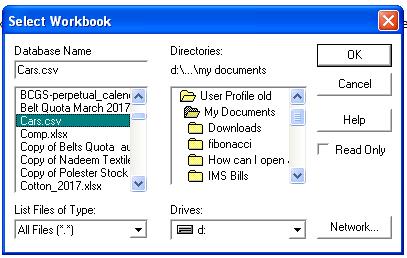
(There are few more tabs in this dialogue box but they are out of scope of this article we will just stick to setting up MS Query with an Excel database.) Double clicking “Excel” will lead you to a dialogue box where you have to select the file, in our case cars.csv - select and press OK.
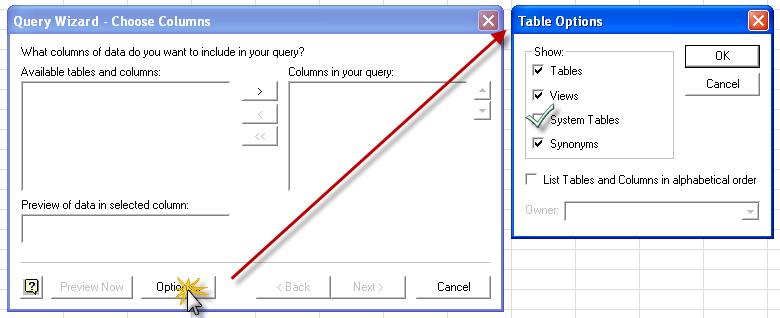
Pressing OK might throw an error “This data source contains no visible table”. Press OK button on the error message and this will take you for another dialogue box “Query Table Select Column”, select Options button and check mark system tables for the next dialogue box.
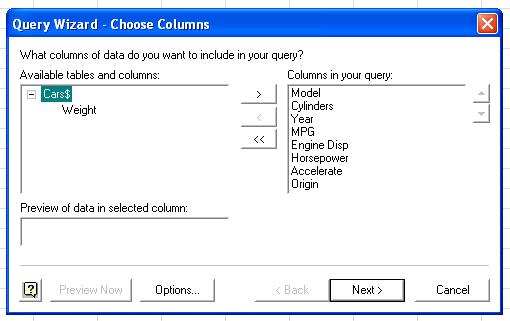
Once pressed, the dialogue box will show the variable present in the table and you can select from it your required (desired) variables - we have selected everything except weight of the car.
Press next and it will take you to the query window. Keep pressing next till get to the finish window and from here select option to “view data or edit query in MS Query”. Press finish. It will take you to the MS Query Window:
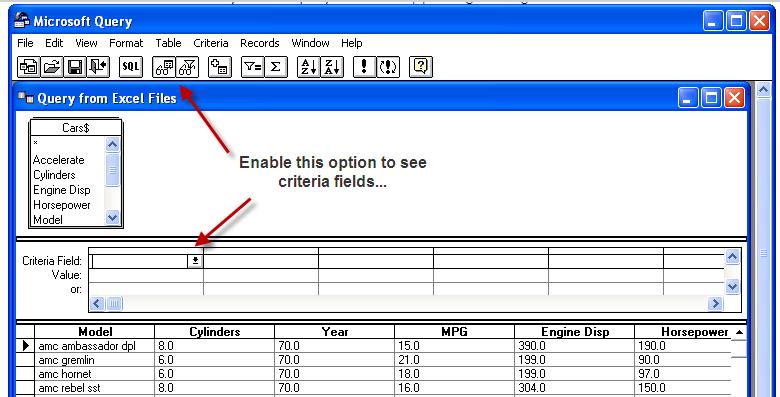
Now you can set the filter criteria for the data.
Setting up criteria
Example criteria 01: let’s filter the data for cars having only 8 cylinders, year = 70 and MPG greater then or equal to 16 will give you following table (you can either press enter or press Query Now Button:

Resulting Table
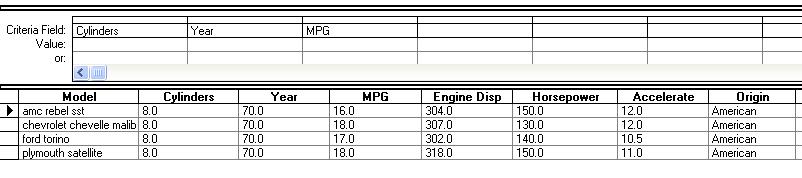
You can see that table has been filtered for all the criteria that were set. A user can go with and add logic function like AND and OR and so on. It can have a Query View and we can also save this query.
To conclude this tutorial – export the filtered table to the blank sheet that we had opened.
When you press return data button it will ask you to the cell reference to put the data:
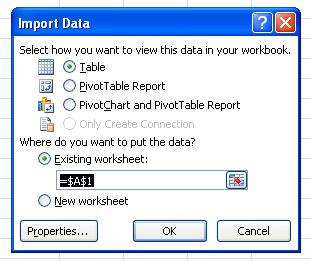
Specify the button and press ok you will have your data in you excel sheet.

Related Tutorials

The world has been growing rapidly over the past few decades. Today modern technology has completely changed our lifestyle and is adding a lot to our daily lives

Excel has so many functions that either one of their or their combination can fulfill most of the tasks required in our work places.

Excel is one of the tools most of us use in our lives. It is almost impossible to tell how many things you can do with Excel.


Latest
-
Understanding How HYPERLINK Works In Excel
Excel has a built in function to create hyperlinks &...
-
Understanding how MS Excel Query Works
“Query” in MS Excel has same meaning as ...
-
An Introduction To Excel Power Map
Our today’s post is about “Power Map&rdq...
-
Using Pivot Charts For Displaying Data
Conventional charts are mostly used for displaying r...
-
Using “Calculated Items” For Analyzing A Pivot Table
In our last post, we explored how to use calculated ...